Programmermind

Atari Basic
Programming

Simple game tutorial

This page explains how to create a simple game using Atari Basic 800/XL/XE. For easier reference I have created a listing of the code first following how the program works.
10 GRAPHICS 3
20 X=1:Y=1:C=1
25 COLOR C: PLOT X, Y
26 COLOR 3:PLOT 15,8:DRAWTO 25,8:DRAWTO 25,15:DRAWTO 15,15:DRAWTO 15,8
27 COLOR 0:PLOT 15,11:DRAWTO 15,13
28 COLOR 2:PLOT 20,11
30 J=PEEK(632) 40 COLOR C:PLOT X,Y
50 X1=X:Y1=Y
60 IF J=7 THEN X=X+1:IF X>39 THEN X=39
70 IF J=11 THEN X=X-1:IF X<0 THEN X=0
80 IF J=14 THEN Y=Y-1:IF Y<0 THEN Y=0
90 IF J=13 THEN Y=Y+1:IF Y>19 THEN Y=19
100 IF PEEK(632)=15 THEN COLOR 0:PLOT X1,Y1
200 IF PEEK(632)<>15 THEN COLOR 0:PLOT X1,Y1
210 LOCATE X,Y,COL:IF COL=3 THEN X=X1:Y=Y1 220 IF COL=2 THEN PRINT CHR$(253);”{clear}{inverse}NICE JOB! “:END 300 GOTO 30

Add Your Heading Text Here

10 GRAPHICS 3
This line creates a Graphics mode with a resolution of 40 X 20 including a text window. Graphics modes range from 0-14 (ensuring you have the GTIA chip upgrade).
20 X=1:Y=1:C=1
When plotting a graphics pixel on a screen to keep track of the positioning it is common to create variables fixed to them. The X represents the horizontal starting position and the Y represents the vertical starting position.
The C variable represents the color for the pixel. In this example C=1 is a placeholder for the color “orange” to be explained in the next section.
25 COLOR C: PLOT X,Y
The COLOR C is read as “COLOR 1” since the variable of C was assigned a value of 1.
The PLOT X,Y is read as PLOT 1,1 since the variable of X was assigned a value of 1 and the variable of Y was assigned a value of 1.
26 COLOR 3:PLOT 15,8:DRAWTO 25,8:DRAWTO 25,15: DRAWTO 15,15:DRAWTO 15,8
The next line is used to draw a blue, partial rectangle which will be used to test for a collision. The easiest way to understand this is to look at the following pictures below.
The first picture shows a graph I drew that is 40 pixels across by 20 pixels down (sorry for the bad image).
27 COLOR 0:PLOT 15,11:DRAWTO 15,13
The next line draws over top of the current image at location 15,11 and draws down to 15,13. The COLOR 0 will draw the pixel in the background color. When a pixel is drawn in the “background color” it will erase any pixels in that location.
So this will draw the opening where our player can enter the small rectangle area.
28 COLOR 2:PLOT 20,11
This line will create a green pixel at location 20,11. This is denoted by the “green” block you see below in the center of the rectangle.
PLOTDRAWTO1

PLOT Command

The first picture shows a graph I drew that is 40 pixels across by 20 pixels down (sorry for the bad image). That is why I also included the graphic screenshot below for better clarity. The orange highlighted area represents the opening that was colored in with COLOR 0:PLOT 15,11:DRAWTO 15,13.

DRAWTO command

Examine the image here and you will see how the rectangle appears with the background colored in. Hopefully this gives you a better understanding of how PLOT and DRAWTO work.

The easiest way to comprehend this is know that a pixel is “plotted” with PLOT and then the area is “drawn to” with DRAWTO. Think of it as starting at one position and drawing a line to the next position

Notice the orange dot in the image. This is where your player position begins at PLOT 1,1 or PLOT X,Y.

Joystick Control

30 J=PEEK(632)

The line above initializes the Atari joystick so that a player can be moved around on the graphics screen. You can also use J=STICK(0) to do the same thing. However using J=PEEK(632) helps to save memory. Saving memory is important since Atari Basic can only hold so much code in memory before you get an error message telling you that the memory is full.

Below is a picture of a typical joystick. These were also originally used on the Atari 2600 system back in the days.

40 COLOR C:PLOT X,Y
This next line will plot our starting joystick position at PLOT 1,1 (the orange pixel in the upper left hand corner).
50 X1=X:Y1=Y
This line will save our X and Y position which will be used to detect a collision later in the demo. It is always important to save the X and Y variable positions before you write the code to move the player (which follows below).

Moving the Player

In the next example, you will learn how the joystick can be used to move the orange pixel around on the screen.
Below I show the code to move the player, it is first important to understand how the joystick works. Take a look at the diagram below.
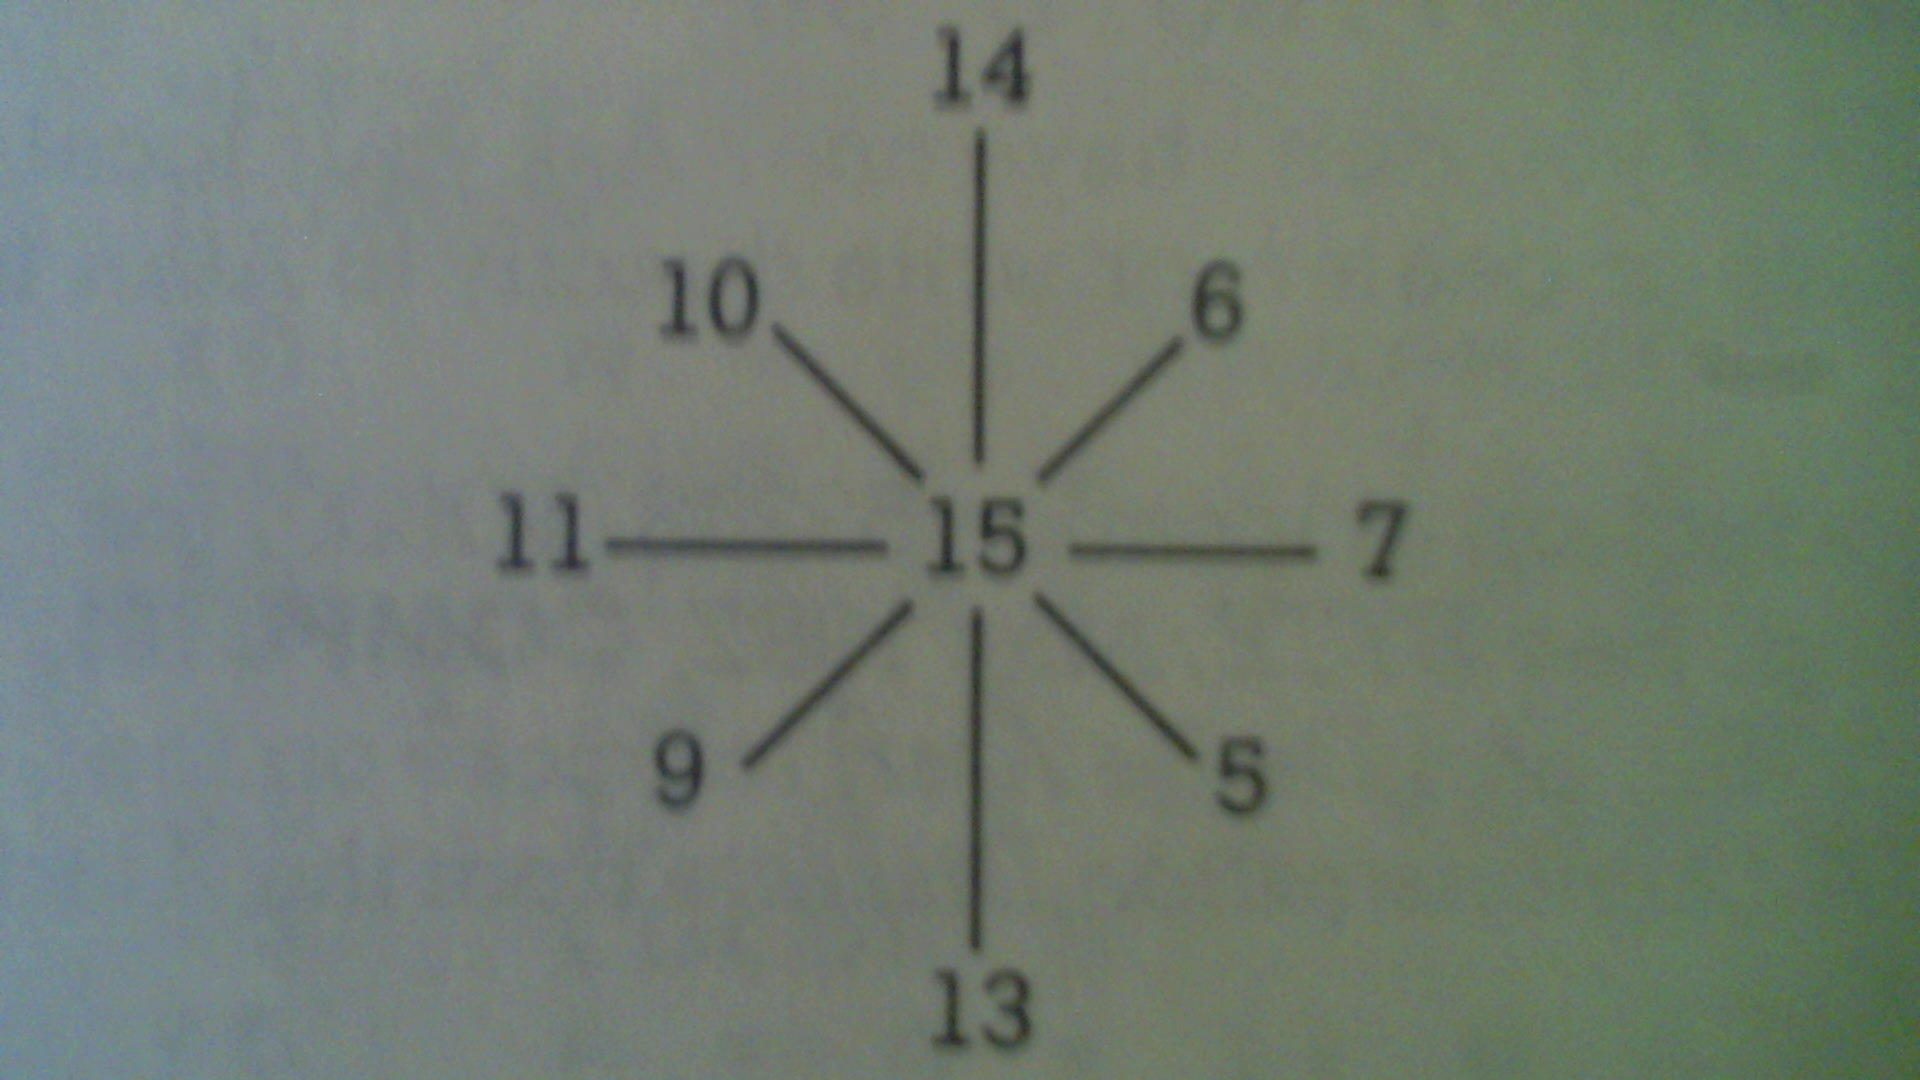
joystickregisters

Joystick Registers

The joystick will return a number based on the direction of where the player moved to. If the player moved up it will return a 14. Down will be 13. If the player moved right it will return a 11. Right will return a 7. The diagonal positions can also be seen in the image below. Finally the value of 15 means that the joystick is in the "idle" position and has not been moved yet.

Moving the Joystick to the Right

60 IF J=7 THEN X=X+1:IF X>39 THEN X=39
This line first checks if the player moved the joystick to the right (return value 7). If the condition is true then the player’s horizontal “x” position will increase by 1. This will move the player from position 1,1 to 2,1. Recall earlier on line 40 where we first positioned the player using PLOT X,Y. So if you add to the position you will get PLOT X+1, Y. Replace the X with the new value and you will see the player at PLOT 2,1.
Once the joystick has been moved to the right the program will then check to see if the player position “orange pixel” has moved off the screen. So this reads as “If Player X is greater than position 39, then player X= position 39.”

Moving the Joystick to the Left

70 IF J=11 THEN X=X-1:IF X<0 THEN X=0
The line then checks to see if the player moved the joystick to the left. If the condition is true then the player’s horizontal “x” position will decrease by 1. Use the above example to understand how variable “X” is affected. Rather than moving forward a position, we are now moving backward by 1 each time the joystick is moved. It reads as PLOT X-1,Y.
Once the joystick has been moved to the left the program will then check to see if the player position “orange pixel” has moved off the screen. So this reads as “If Player X is less than position 0, then player X= position 0.”

Moving the Joystick Up

80 IF J=14 THEN Y=Y-1:IF Y<0 THEN Y=0
The line then checks to see if the player moved the joystick up. If the condition is true then the player’s vertical “y” position will decrease by 1. This will move the player from position 1,1 to 1,0. This reads as PLOT X, Y-1.
Once the joystick has been moved up the program will then check to see if the player position “orange pixel” has moved off the screen. So this reads as “If Player Y is less than position 0, then player Y= position 0.”

Moving the Joystick Down

90 IF J=13 THEN Y=Y+1:IF Y>19 THEN Y=19
The line then checks to see if the player moved the joystick down. If the condition is true then the player’s vertical “y” position will increase by 1. This will move the player from position 1,1 to 1,2. This reads as PLOT X, Y+1.
Once the joystick has been moved down the program will then check to see if the player position “orange pixel” has moved off the screen. So this reads as “If Player Y is greater than position 19, then player Y= position 19.”

Check for an "idle" joystick value

100 IF PEEK(632)=15 THEN COLOR 0:PLOT X1,Y1
If the player has not moved yet (which means the joystick is still showing the return value of 15) then we will erase the player’s position using COLOR 0:PLOT X1,Y1.
Recall earlier than our X and Y variables were saved with X1=X and Y1=Y. So each time we move we will remember where the player was before that movement occurs.

check for a Moving position

200 IF PEEK(632)<>15 THEN COLOR 0:PLOT X1,Y1
This will check if the player has moved in any direction and erase the player’s position. This creates the illusion of animation.

Check if the player hit a wall

210 LOCATE X, Y, COL:IF COL=3 THEN X=X1:Y=Y1
The LOCATE keyword will look at a PLOT position and check for the color that it “collided” into. So in this example it is constantly checking our PLOT X,Y to see if the color is blue (or COL=3). So if our player collided with a “blue” pixel then we will freeze that player in position using X=X1:Y=Y1. So this means if the player ran into the blue wall then stop them at that position to create the illusion of running into a solid wall.
The X=X1 is going to remember the previous X position before the joystick moved so if the LOCATE statement is true (COL=3) then the X position will retain the earlier value, which keeps the player at that horizontal position.
The Y=Y1 is going to remember the previous Y position before the joystick moved so if the LOCATE statement is true (COL=3) then the Y position will retain the earlier value, which keeps the player at that vertical position.

Check if the player found the blue pixel

220 IF COL=2 THEN PRINT CHR$(253);”{clear} {inverse}NICE JOB! “:END
This tells the program that the player run into a “green” pixel. The green pixel is the “dot” in the center of the opened rectangle. So if the player found that location then the program will clear the screen. Then the text will show “NICE JOB!” in an inverse mode. The inverse mode reverses the text colors making it appear “highlighed”. This is also known as “masking” the pixels. Finally the program will END.

Repeat the loop

300 GOTO 30
This will cause the program to go back to line 30 to repeat the code over and over (lines 30-300) so that we can keep checking for the joystick movement and collisions.
The video below explains step by step how the program was created.

Leave a Comment

Your email address will not be published. Required fields are marked *